This is the third post in our series on the recently launched User Engagement Triggers in Google Tag Manager. We have previously featured the YouTube Video trigger and the Scroll Depth trigger. This post will focus on the last of the new triggers; the Element Visibility trigger.
The Element Visibility trigger will trigger a tag when a specified element or set of elements has scrolled into view. We have found this to be the most versatile of the 3 new triggers. However, it is also the most complicated and requires that you have a basic understanding of how HTML and CSS (specifically CSS selectors) work. You do not have to be able to build a website but at least understand the basic building blocks.
We have found a number of interesting use cases for this trigger but for this post we will focus on the example we most frequently encounter. Determining how many people have scrolled all the way to the end of a blog post can be tricky at times. You could use the Scroll Depth trigger and assume that if the user scrolls 100% of the page then they have seen the entire post. However, if a blog post, like our Outbound Links in GTM post, has many comments beneath it, then the post actually ends long before the bottom of the page. There may be far more people reading the entire post than scrolling all the way to the bottom of the page.
In this post I will create a trigger that fires when the top of the comments section scrolls into view on any of our blog pages and a tag to send data to Google Analytics as an event.
Step 1: Determine the trigger element
The first step will be to determine which HTML element (or elements) will trigger the tag. If you need to a single element to trigger the tag then using the element’s ID is the easiest option as it should be unique to that element. This means there is no chance of the wrong element triggering the tag. However, if more than one element is required or your element does not have an ID then you will need to use the CSS selector.
You can use the Elements tab in the Chrome or Firefox Developer Tools to figure out which attribute you can use for your CSS Selector.
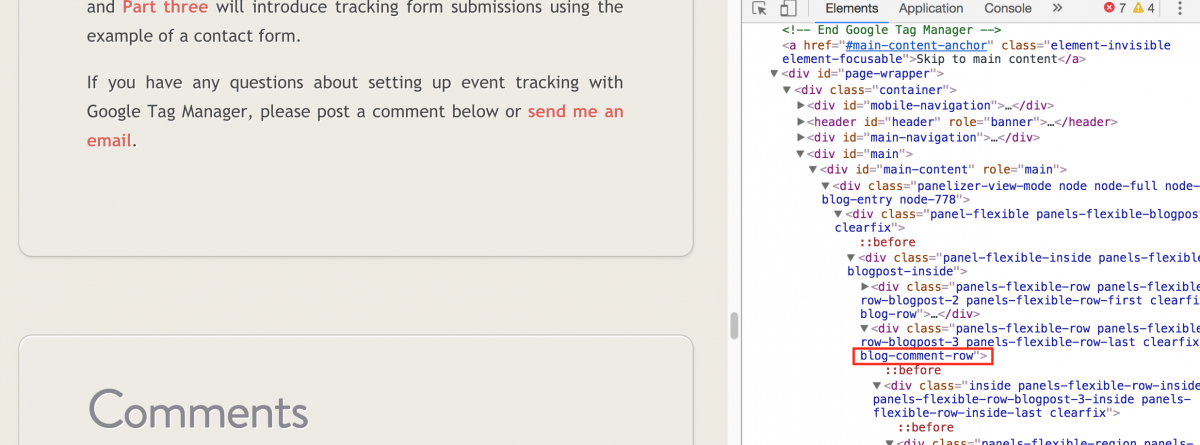
In our example we need the comments section of our page to trigger the tag. A quick inspection of the HTML code of our blog pages shows that the comments section does not have an ID. However, there is unique class on the comments section container that we can use. This class’s name is “blog-comment-row”. You will have to find the best way to identify the bottom of the post on your pages.
Step 2: Create the Element Visibility Trigger
Now that we have determined the triggering element we can create the Element Visibility trigger. We will be creating the trigger based on our example – these blog pages. You will need to modify this to suit your own blog pages or whatever you use the trigger for.
- Go to the Triggers section of Google Tag Manager and click the red New button.
- Click on the Trigger Configuration Section to open the Trigger Type list.
- From the list select Element Visibility.
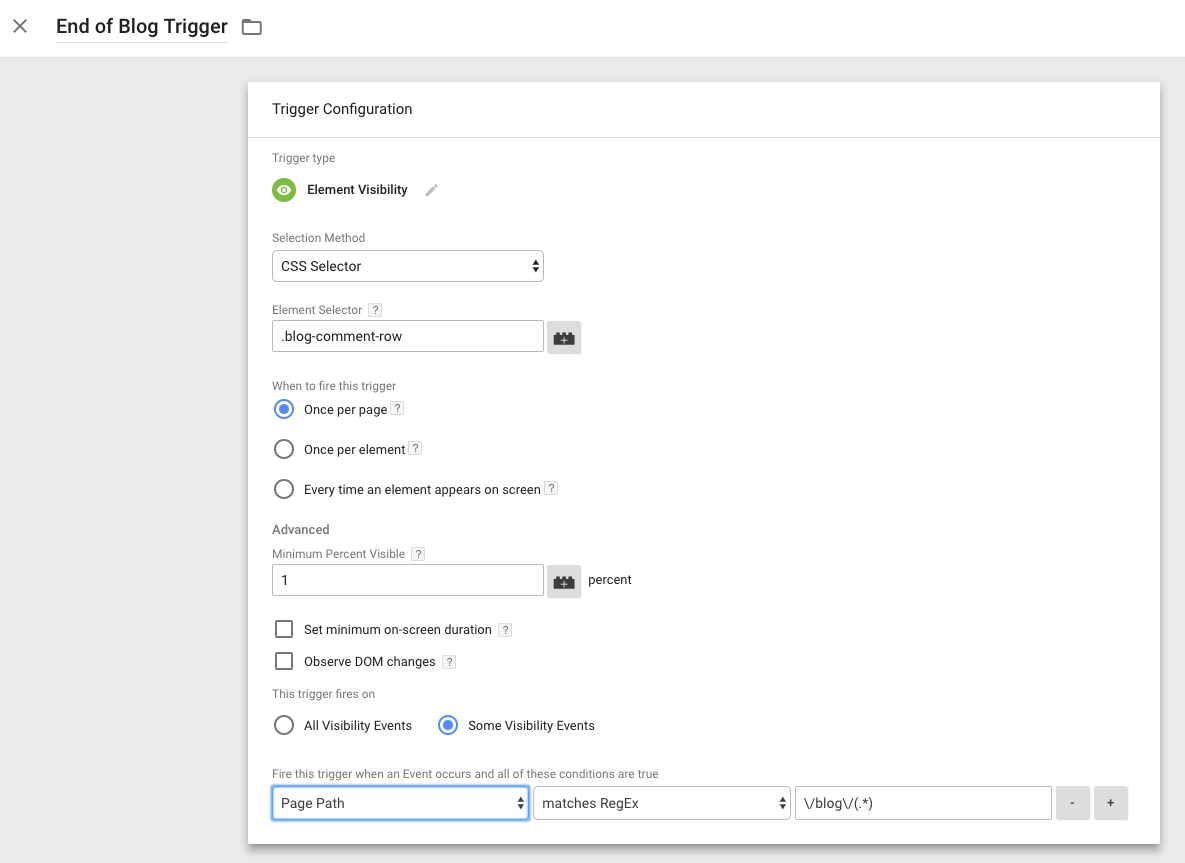
- Name the trigger: End of Blog Trigger.
- Choose your Selection Method from the dropdown. If your element has an ID then leave it as ID. For our example we will set it to CSS Selector.
- In the textbox add your Element Selector/ID Selector textbox add your ID or CSS Selector. For our example this will be: .blog-comment-row.
- Choose how often to fire your trigger. The options are once per page, once per element or every time an element appears. For our example we will leave the radio button on Once per Page.
- For our example we will set the Minimum Percent Visible to 1% as the Comments section can be quite long. Remember we only want to know when the very top of it appears on the screen.
- Our example will leave the to checkboxes blank.
- Change the This trigger fires on radio button to Some Visibility Elements.
- From the first drop down select Page Path and from the second dropdown select matches Regex.
- For our example we will only trigger the tag on blog post pages. In the textbox use the regex: \/blog\/(.*)
- Save the trigger.
Step 3: Create the Tag
Now that the trigger is set up we will create a simple tag to send the information to Google Analytics.
- Navigate to the Tags section of Google Tag Manager. Click on the red New Button.
- Click on the Tag configuration section to open the tag type menu.
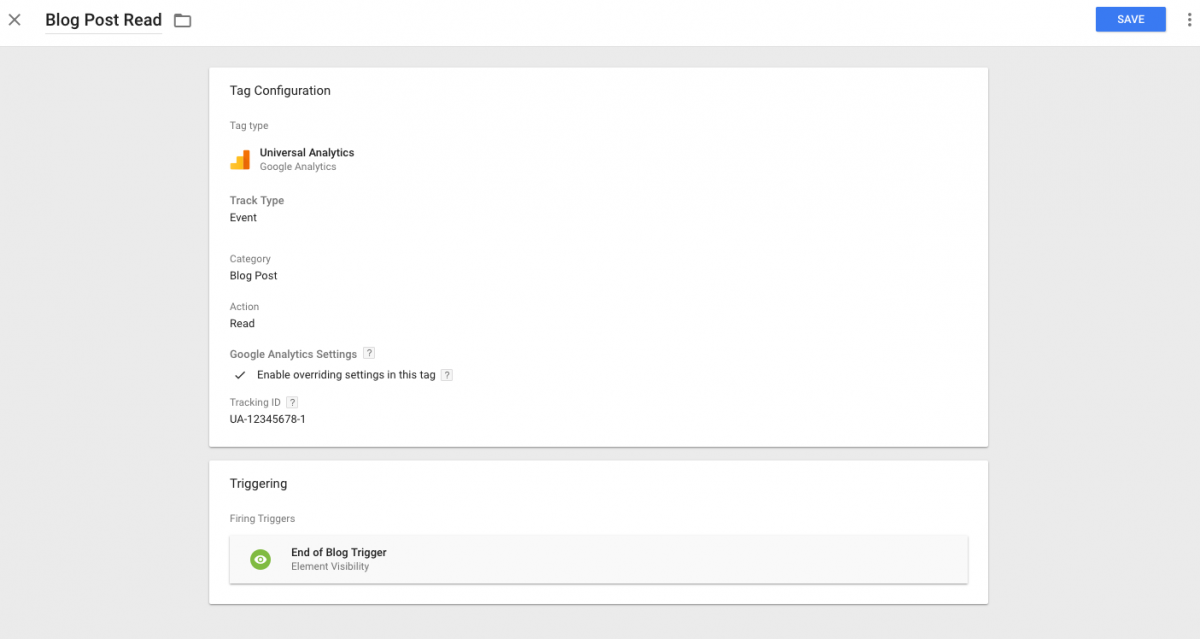
- Choose the Universal Analytics tag type.
- From the Track Type dropdown select Event.
- For the event’s Category add “Blog Post”.
- For the event’s Action add “Read”.
- Add your Google Analytics Settings variable or click the Override Settings checkbox and input your UA number.
- Add the End of Blog Trigger.
- Save the tag.
Your tag and trigger are now setup and can be published.
If you have any questions about the Google Tag Manager Element Visibility trigger and how to use it then please send me an email.