
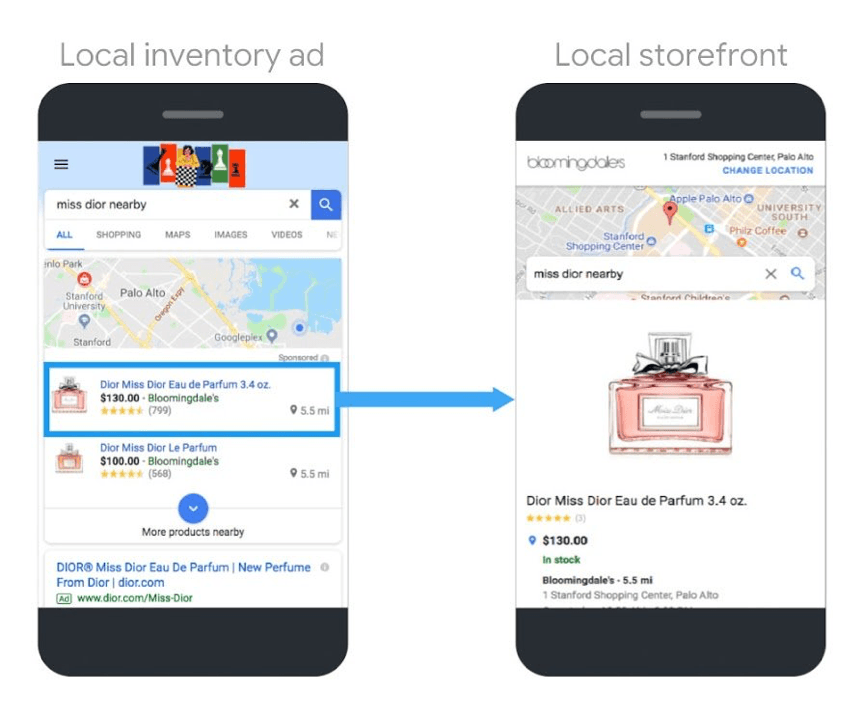
Traditional brick and mortar retail has changed dramatically in the last decade, in fact, eight out of ten consumers are less likely to go to a store when the website does not provide online inventory. So, what are you as a retailer supposed to do in a world where e commerce and in-store shopping experiences are so intertwined? This is where Google Local Inventory Ads come in. Local Inventory ads showcase your available products and store information to nearby shoppers searching with Google. This is a great way to target potential clients and provide them with useful product information.
Local Inventory Ads help local shoppers find useful information about your store and products, such as:
- Store hours
- In-store inventory
- Promotions
- Directions
In this 5-step-guide, you will learn if Local Inventory Ads are right for your business and what you need to do to run Local Inventory Ads for your store.
Are Local Inventory Ads right for your business?
Depending on your industry, audience, or even region, your business may already be visible online. However, for companies who are not yet highly digitized, the exact benefits of online advertising for brick-and-mortar can be difficult to understand.
How can these online ads really support the sales and revenue of a physical store? In short: by driving interest and awareness, pushing promotions, and even carefully targeting users with the right products.
If you are a retailer with a brick and mortar store in Australia, Brazil, Canada, France, Germany, UK, US or Switzerland, Google’s Local Inventory Ads (LIA) are available for your business.
Common industries leveraging Local Inventory Ads are:
- Retailers
- Grocers
- Restaurants
- Automotive dealerships
- Service providers
If you want to drive higher foot traffic and revenue in any of these industries or areas, inventory ads can support your efforts.
Let’s look at how to set up Google’s Local Inventory Ads (LIA for short) for your business in 5 steps.
Step 1: Set up your accounts
You need three separate accounts to run local inventory ads:
For ease of use and linking, we recommend adding the same email address as an administrator user in your Merchant Center account and as a manager or owner in your Google My Business account:
Step 2: Enable local inventory ads in Merchant Center
Next step is enabling local inventory ads in Merchant Center settings. Login to your Google Merchant Center account, navigate to the 3-dot icon in the right corner and select “Merchant Center Programs”.
Amazee Metrics Tip: Merchant Center programs are only visible to Merchant Center admin users, so makes sure you have sufficient permissions.
Step 3: Create, register and submit feeds
Once you have joined the LIA program, you would need to create and submit two types of products feeds:
- Local product feed: The local products feed is a list of all the products that you sell in your stores with attributes that describe the products. Some attributes are required for all items, some are required for certain types of items, and others are recommended. This is an example local products feed, outlining the required attributes.
- Local product inventory feed: The local products inventory feed is a list of the products you sell in each store. Also in this case some attributes are required for all items, some are required for certain types of items, and others are recommended.
Register and submit local feeds
You must register a feed the first time you submit it to the Merchant Center. You only need to complete this registration process once per feed. Follow these steps to register your feed.
Upload your feeds
After you have registered your feed, you can upload your data to the Merchant Center. We recommend creating a schedule for your upload so your data is sent to the Merchant Center automatically. Learn more about available upload methods.
Amazee Metrics Tip: Make sure the local products feed or local product inventory feeds you upload, contain all required product attributes, or Google will not surface any local items.
Once you register and submit your local feeds, check your live ads to make sure your feeds have been mapped correctly. Data mapping across feeds helps surface the most helpful information for shoppers. This information is collected from local inventory ads in Google My Business Locations, the local products feed, the local product inventory feed, and the generic online products feed you need to run Google Shopping Ads.
Amazee Metrics Tip: Check your data mapping across all three feeds carefully to make sure everything is working as intended.
Step 4: Request inventory verification
Once you have submitted your product data, you can initiate inventory verification checks. These checks help Google ensure that the inventory information you submit matches what is actually in your stores. Here are more details about the inventory verification process.
Step 5: Enable Local Inventory Ads in your Google Ads Shopping campaigns
To activate Local Inventory Ads you need to have an active Shopping campaign in your Google Ads account. If you do not have one, create a Google Ads account. To enable Local Inventory ads in your Shopping campaign, simply navigate to the Settings tab and check the “Enable local inventory ads” box.
Amazee Metrics Tip: There are ways to customize your setup and improve the performance of your Local Inventory Ads: Check out local inventory ads optimization features.