
An updated version of this blog post was published.
If you run a blog, content site or single page site then you should implement Scroll Tracking. As the name implies Scroll tracking will show how far down the page your users are scrolling. This will help you decide which type of content is keeping your audience’s attention and which isn’t. This means you can make better decisions about the content you produce in future.
In this tutorial we will take you step-by-step through how to implement scroll tracking for Google Analytics using Google Tag Manager. We start by showing you how to implement the code to track the user’s scrolling behaviour. Once this is in place we will add a Google Analytics event based on this behaviour. By the end you will have GTM sending scroll tracking events to Google Analytics. These will show what percentage of your page users have scrolled. The specified percentage points that will be sent to Google Analytics are 0%, 25%, 50%, 75% and 100%.
In addition we have included a Google Analytics custom report to help you easily see the data you are collecting.
Step 1: Scroll Code
In your GTM container create a Custom HTML tag and add this scroll tracking script, which was written by Rob Flaherty at parsnip.io:
Step 2: Scroll Code Trigger
The next step is to create a trigger so that this code runs on each page that you need it to.
We want to make sure that the scroll depth tracking is active from the time the page is loaded. For this we will use a Pageview – DOM Ready trigger. If you want to track scroll depth on every page, then simply add an All DOM Ready Events trigger. However, in this example we are only going to add it to the blog pages of our site.
- Therefore, select Some DOM Ready Events.
- From the first dropdown select Page Path and from the second matches RegEx.
- In the text box input the following regular expression: (.*)\/blog\/(.*)
- We are using URLs containing /blog/ as an example here. You should replace this RegEx with one that matches whatever URL – or group of URL’s – you are looking to add scroll tracking too.

Step 3: Setup Variables
The Scroll Depth Tracking tag pushes an event to the Data Layer. This event contains values for the Google Analytics Event Category, Action and Label. You need to setup variables to capture these.
- Under the Variables section of GTM create a new User-Defined Variable called Scroll Event Category.
- Choose the variable type Data Layer Variable and under Data Layer Variable Name type “eventCategory” into the text box.

You need to repeat this twice more:
- Add the second Data Layer Variable called Scroll Event Action and fill in the Data Layer Variable Name: eventAction.
- Finally, add the third one called Scroll Event Label which should have the Data Layer Variable Name: eventLabel.
Step 4: Add the Scroll Tracking Event
Now you need to get the scroll tracking data into Google Analytics. This is done by adding the Scroll Tracking Google Analytics Event.
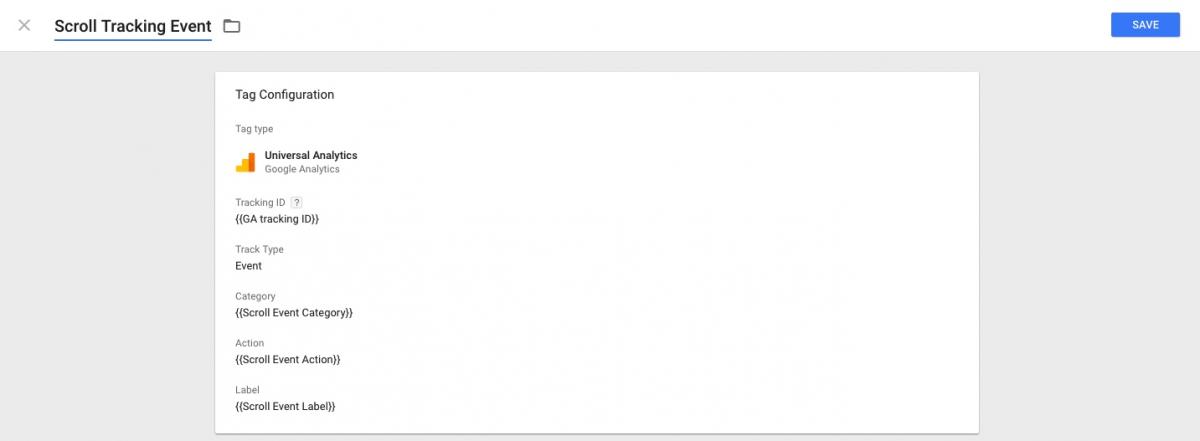
- Create a new GTM Tag called Scroll Depth Event and select the Universal Analytics Tag Type.
- Add your Universal Analytics ID and change the track type to Event.
- Now set the Event Category, Action and Label to the Variables we created earlier by clicking the button to the right of each textbox. For Category select Scroll Event Category and so on for the other two.
Step 5: Add the Event Trigger
Our final step is to setup the trigger for the Google Analytics event.
- Under Triggering add a new trigger of the type Custom Event.
- Set the Event name to ‘ScrollDistance’.
- Save both the trigger and the tag.

Congratulations, your scroll depth tracking is now setup. Once you publish the container you will begin receiving data showing how far down the tracked pages your users are scrolling.
Visualizing The Data
To make sure that you are able to easily access the scroll data you are now collecting we have created a custom report for you to use.
Start by adding this custom Google Analytics report to the Google Analytics view of your choice.
Once the report has loaded:
- Click on Edit.
- Change the page filter to match the RegEx you used in Step 2 above
- Click save.
Now you have a report that will show all the pages that have scroll tracking enabled. When you click on each of the pages in the report you will see a list of percentages. These represent how far down the page each visitor has scrolled. Next to each percentage point you will see how many visitors have scrolled past that point. Note that if a user scrolled to 100% they will also be counted as having scrolled 0%, 25%, 50% and 75%.
If you have any questions about setting up scroll tracking with Google Tag Manager, please send me an email.