
In Part 3 of our updated Google Tag Manager Tutorial, we covered form tracking with the Form Submit Trigger, which is an easy approach to master contact form tracking. However, depending on the form’s code and its technology, this might not always work. This can be linked to on-site JavaScript issues or form submits not being picked up by GTM.
In this last part of our series, we will take a closer look at Form Submission tracking with the help of the Element Visibility Trigger. This type of trigger is useful not only for forms but for all types of pop-up windows and display banners and notifications.
Google Analytics does not automatically track this activity but Google Tag Manager (GTM) offers an automated solution for tracking form submissions.
In this tutorial, we assume that you already have a Google Tag Manager account, have created a container, and have installed it on your website. You should also have a Google Analytics account set up for your website and have linked it to GTM.
What Makes Form Tracking Difficult?
Let us take a step back and shed some light on why there are so many different techniques for form tracking. There are various types of forms and no global standard on how these are developed, which, as a consequence, can make tracking thereof challenging. Here is an overview of the most common scenarios/events that can occur on your website after a form was submitted:
- The form redirects the user to a thank you page: Great, this is tracked automatically via Pageview.
- The form shows a thank you notification after the form submit button was clicked: Great, if it sends a form submit to GTM. Read more about this in our blog post tutorial.
- The form refreshes and displays a thank you text: Challenging but doable with the Element Visibility Trigger.
- A pop-up window informs the user about the successful submission: Challenging but not impossible with the Element Visibility Trigger.
How to Start with Form Tracking
As a start, we recommend that you enable GTM’s built-in Form Variables and create a Form Submission Trigger that listens to all form submissions. Read more about the setup in our last blog post tutorial. The Form Auto-Event Listener will detect all standard submit browser events. Run a few tests with your form.
If GTM does not record a form submission in the Preview & Debug Mode, the standard tracking approach will not work and you will have to use an alternative method instead. This is quite common, which is why we will work with an awesome alternative: The Element Visibility Trigger.
The Element Visibility Trigger Explained
The Element Visibility (EVB) Trigger tracks when a particular element appears on the screen (due to clicking, scrolling, or other interactions) and, hence, has a wide variety of use-cases. This technique can be applied to forms when a particular thank you message appears after the form was submitted successfully. This can be a thank you notification on the same form page, a thank you banner when the form page reloads, or a pop-up window. For more practical examples, click here.
In short, the Element Visibility Trigger fires whenever an element(s) that you specified appears in the browser’s viewport. The viewport is the visible area of the browser window. When an element is visible in there, it is viewable by the user.
For the selection method, to determine which element you want to target, you have two options to choose from:
- Element ID: This matches the first element on the page with the given ID. This performs well if you only have one element to track.
- CSS Selector: This matches the element or a group of elements on the page that fits your selector and is suitable for tracking multiple elements that can appear on a page.
Step 1: Find a Unique Identifier
Start by inspecting the form’s success message that is displayed.

To do so, right-click to access your browser’s developer tools. In Chrome, for example, right-click on the element you want to inspect and select Inspect element. This will show you various information such as the message’s content, its CSS class, ID, and more elements. In our example below, the message has an ID submitted-message which is unique and can be used as a condition in the EVB Trigger.

Step 2: Create the Element Visibility Trigger
The trigger defines what exactly we want to track that becomes visible in the user’s viewport. In this case, it is a check to see if the thank you message appears.
For the trigger setup, follow these steps:
- Navigate to Triggers in the left-hand sidebar and create a new one.
- Replace Untitled Trigger with a descriptive name like EVB – Contact – Form Submitted.
- Choose Trigger Type: Element Visibility.
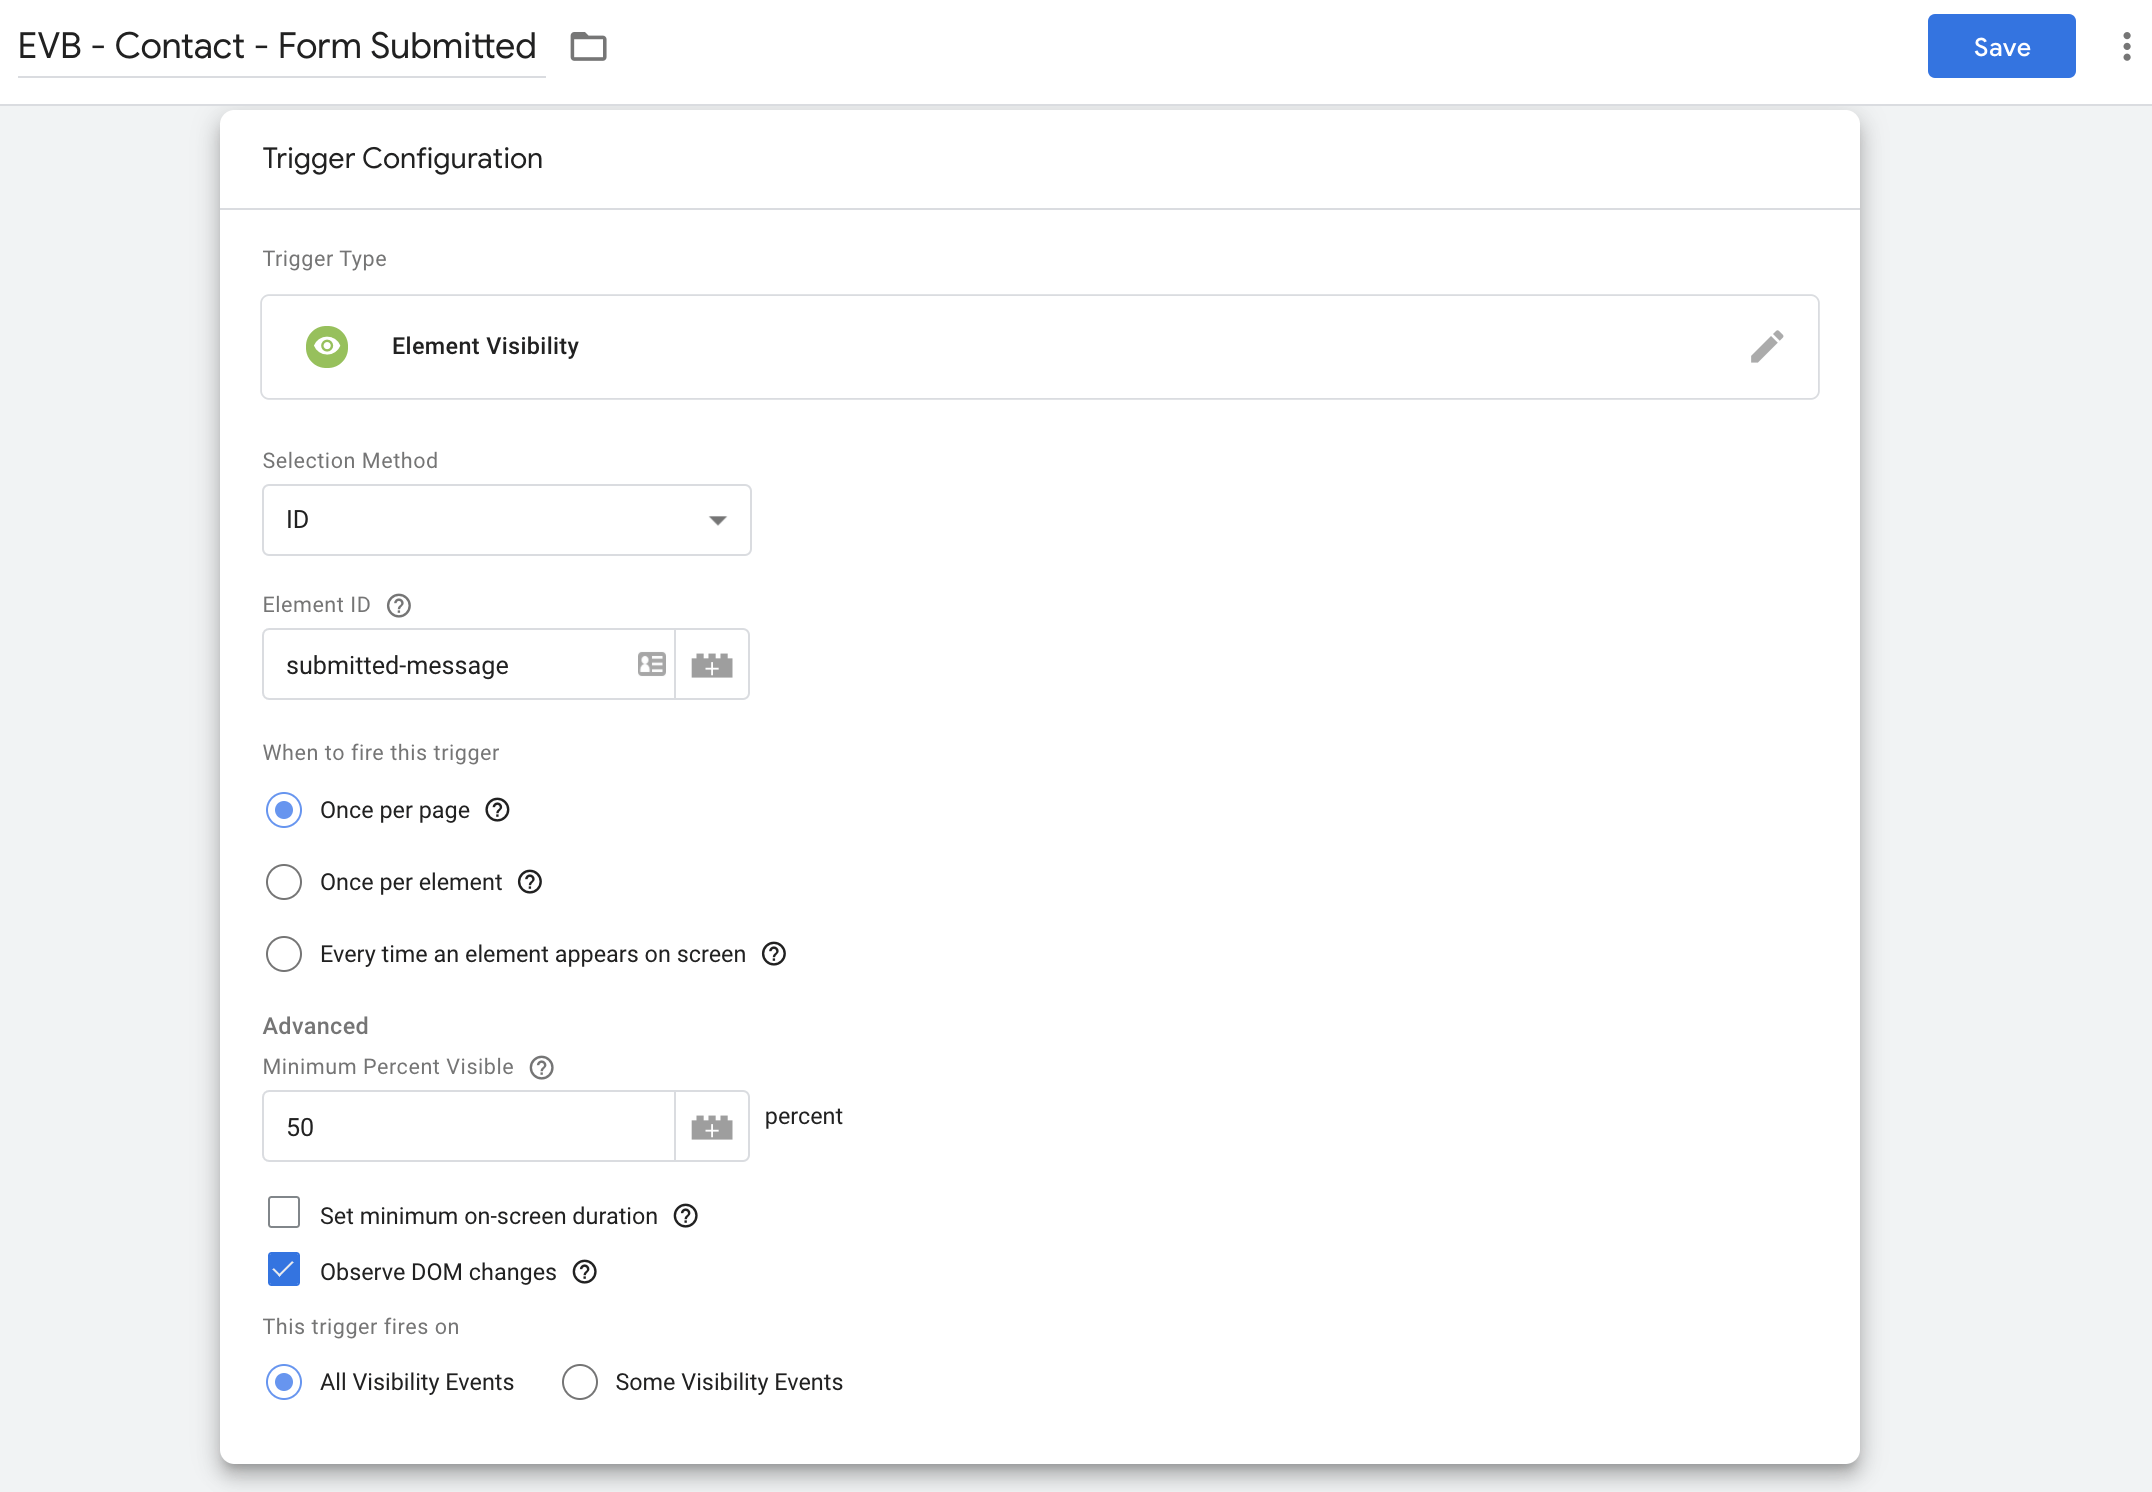
For the trigger configuration, you will set:
- Selection Method: Choose ID from the dropdown.
- Element ID: submitted-message
- This uses the unique ID you identified in Step 1 to specify exactly which thank you message you want to track.
- When to fire this trigger: Once per page
- This means it will fire only once on the current page when the element that matches the ID is visible to the viewer.
- The other two options can be useful when more than one element is tracked on a page with the CSS Selector
- Minimum Percent Visible: 50
- Here you can specify a value in percentages, which is how much of the element needs to be visible in the viewport for the trigger to fire. So if you set the value to “50”, at least 50% of the matched element needs to be visible.
- By default, elements must be at least 50% visible on screen to trigger an event. This is sufficient in our case.
- Observe DOM changes: Check this box to enable the trigger to track matched elements that appear as the DOM changes.
- This setting lets you track the visibility of elements that might not exist in the DOM (Document Object Model) when the contact form first loads. In other words, this will wait for an HTML element with the thank you message to appear.
- Further conditions to fire the trigger:
- Since we are using an ID, which should be unique to this form, we do not need to set more conditions here.
- If this ID is used for other forms as well, it would be advisable to set the Page Path to include the page where the respective form is presented
Click Save to finalize the trigger setup.
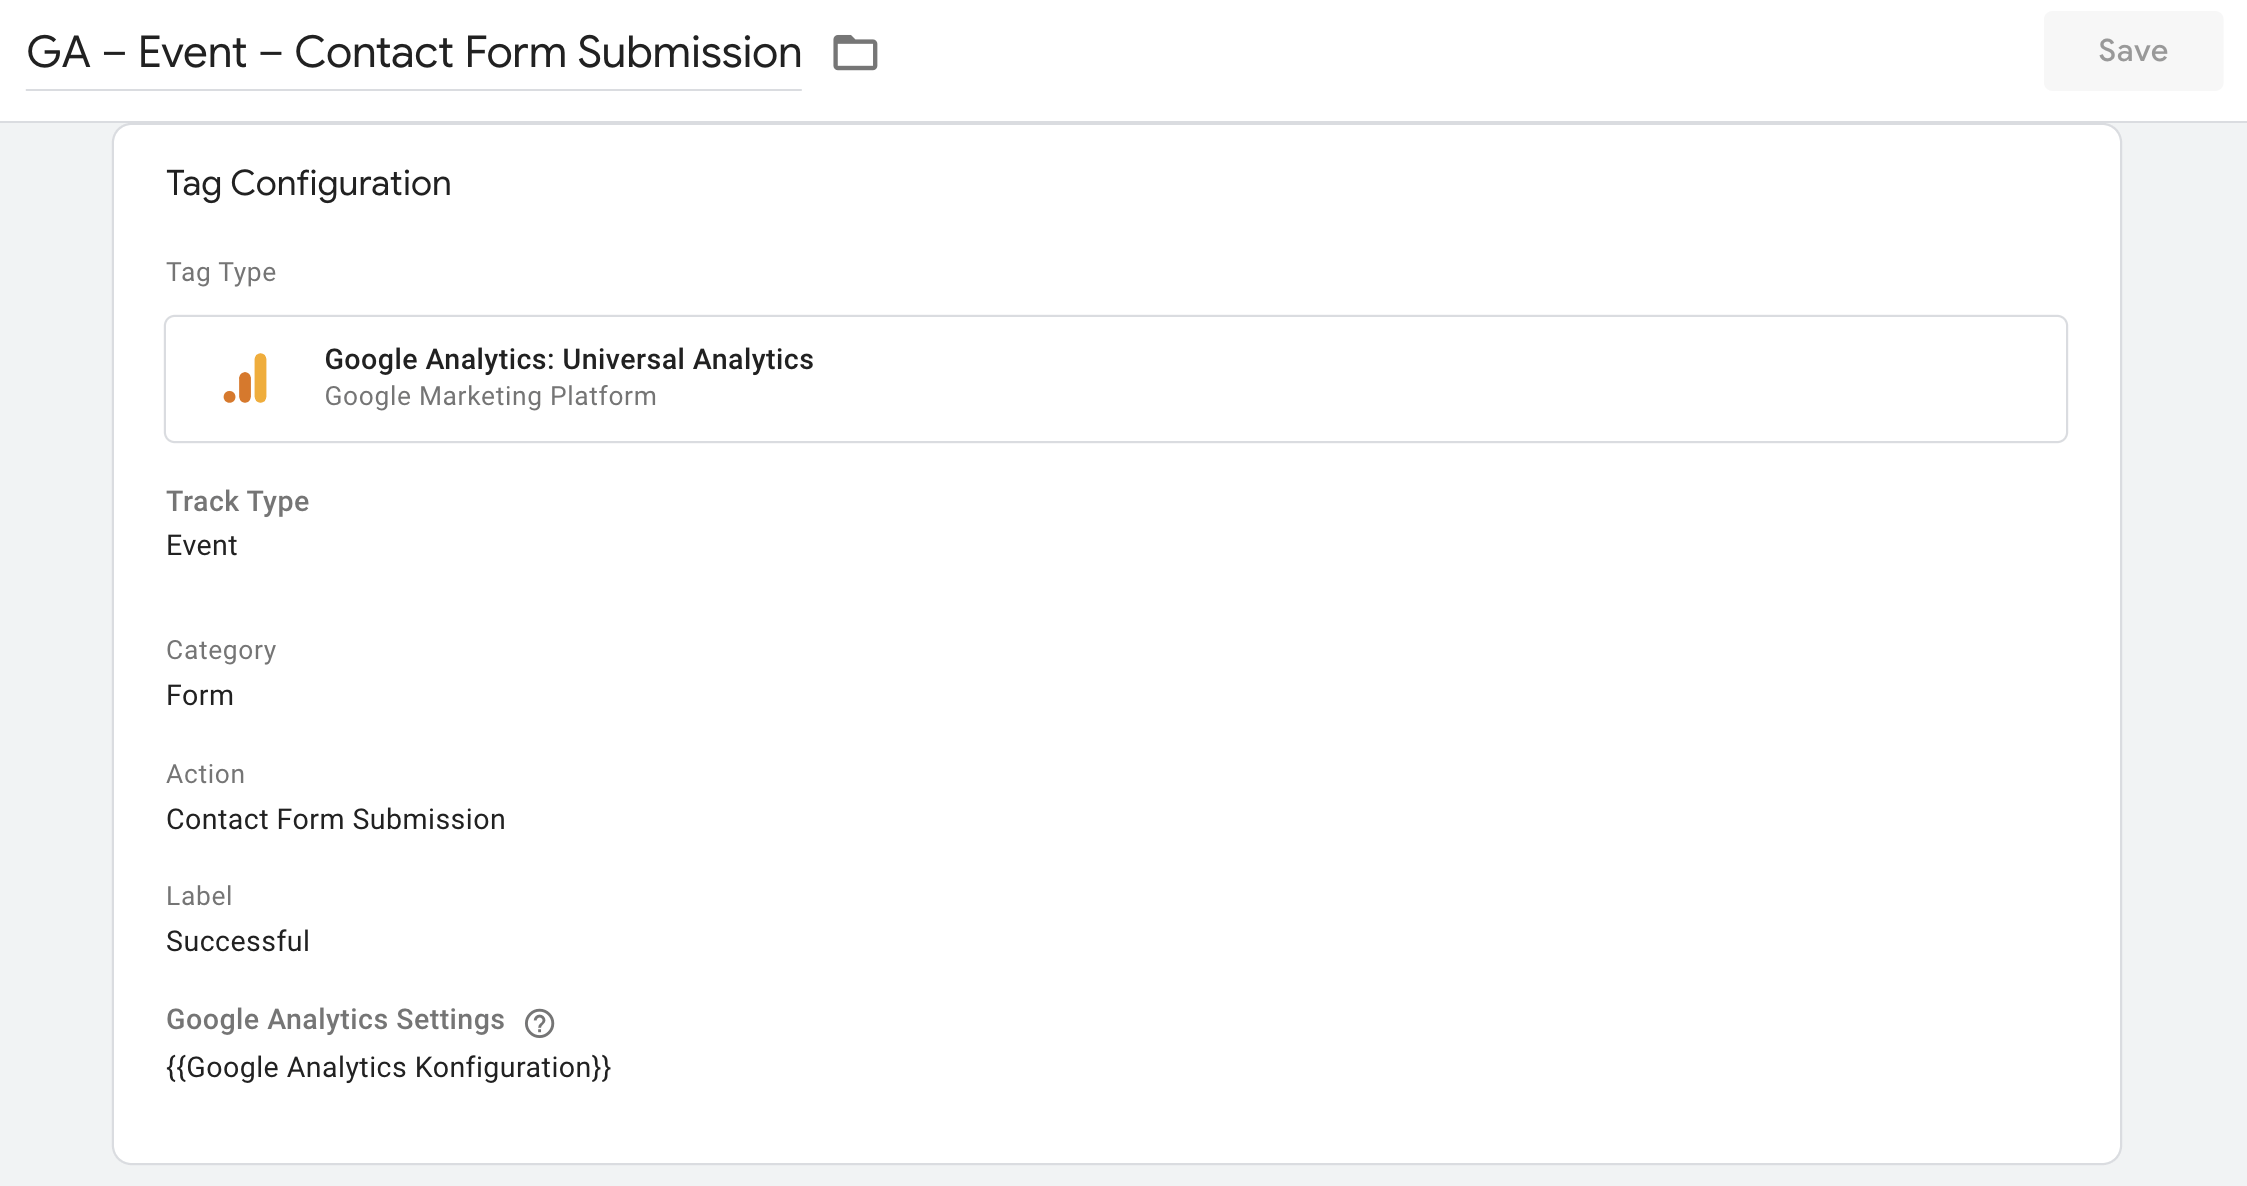
Step 3: Create The Form Submission Event Tag
The last step in tracking form submissions is simply creating a tag that will record the event in Google Analytics with the information that you want. The event will fire when the conditions of the Element Visibility Trigger that you set up in the previous step are met. Now, create the tag as indicated in the following screenshot:
Step 4: Save a Version, Test, and Publish
The tag you just created will not start working until you publish it but, first, you should thoroughly test that it is working as expected. Having saved your tag, enable the Preview mode (click on “Preview” in the top right corner), go to your website, and refresh the page.
Make sure to cover these test scenarios for your form tracking:
- Submit the contact form without having completed it. The tag should not fire in this case.
- Complete the form with correct details and then click on submit. The tag should fire as soon as the thank you message appears on your screen.
The Google Analytics Real-Time Event Report should display your event hits if everything is working properly. Read our blog post on Google Tag Manager Testing Problems and how to fix them if you run into any issues.
If all your tests are successful, then you can click the Submit button in GTM. Give this published version a descriptive name like Contact Form Submission Event added and click Publish.
Conclusion
While standard form tracking is the easiest to set up, it often does not work due to complications in the on-site JavaScript. Working with the Element Visibility Trigger provides you with an alternative to dealing with these edge cases. It also makes your data much more reliable and accurate. This way you ensure that no invalid or unwanted clicks on the submit button are tracked but only those form submissions that were actually completed and sent off successfully.
Our Google Tag Manager Tutorial has covered Tracking External (Outbound) Links, Download Links Tracking, and Basic Form Submissions. Are there other types of events you would like to track? Do you need assistance with a more complicated case? Feel free to contact us – We are happy to help! And for exciting updates, subscribe to our newsletter.