Part 3: Form Submissions
An updated version of this blog post was published.
In the third part of our updated Google Tag Manager Tutorial for GTM Version 2, we show how to track form submission. Tracking forms with Google Tag Manager is a particularly useful technique when your website does not show easy-to-track confirmation pages after users fill out a form.
This tutorial will show you how to track form submissions using the example of a contact form. What you will find here is an example configuration. Since every website is a little different, you will have to adapt this example. The steps below describe the general process and indicate which parts need to be changed for your specific website.
1. Inspect the Form
If you inspect the form on your website with your browser’s developer tools, you can look at the html elements that make up the form. In Chrome, for example, right click on the form and select “Inspect element” to see the html.

You need to find some attributes that are unique to the form. Here you can see that the form has an id, “contact-form”. This is a good identifier that is not used on any other elements in the website. If your form does not have a unique id, you could also use the form classes, the form action url, or the form text to identify this particular form. Using id or classes is simplest, so we recommend using these if possible.
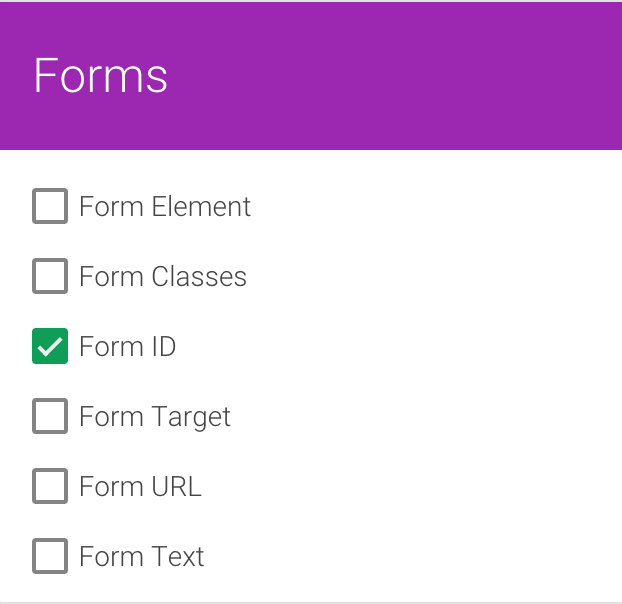
2. Enable a Built-in Form Variable
Now that you have an identifier for your form, you can enable the appropriate variable in Google Tag Manager. In the Google Tag Manager interface under Variables, check the box next to the type of form variable that you found in the previous step. For example, if your form has a unique id, then you will enable “Form ID”, if it has unique classes then you will enable “Form Classes”, etc.
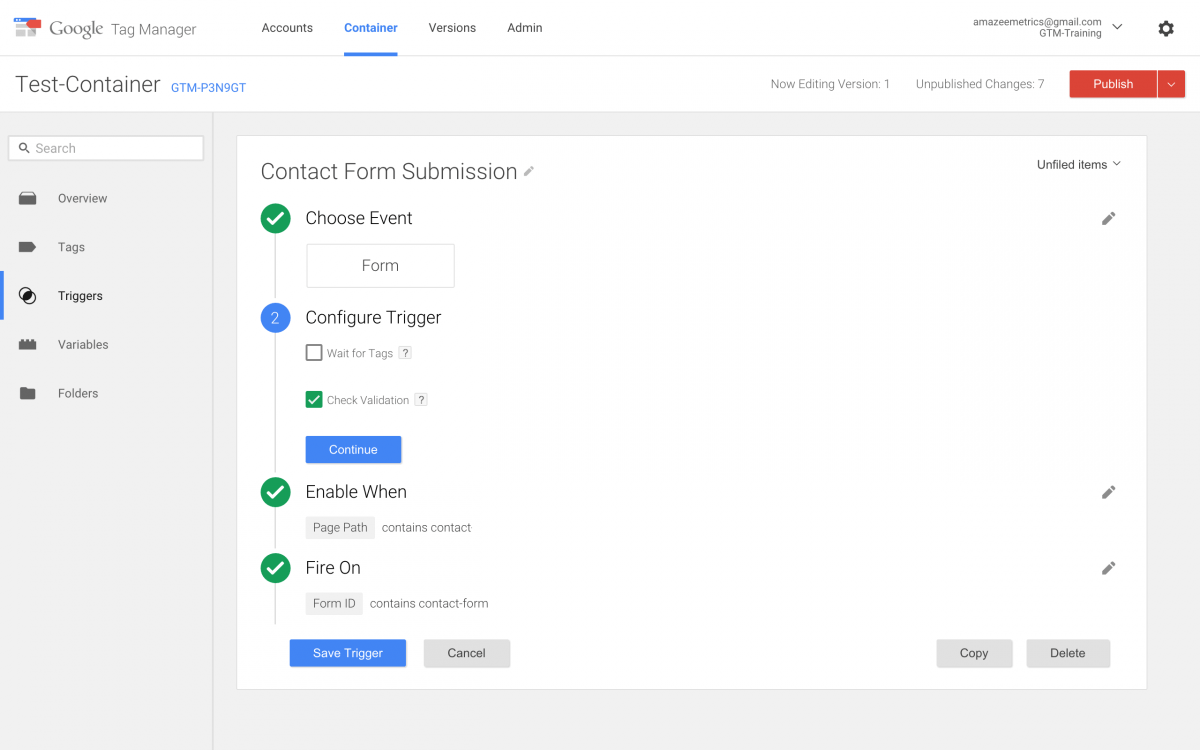
3. Create a Form Submission Trigger
This trigger defines what is a contact form submission. It listens for form submissions on particular pages of your website, and checks whether they are the contact form that you specify.
- Under Triggers, click “New”.
- Replace “Untitled Trigger” with a descriptive name like “Contact Form Submission”.
- Choose Event “Form”.
- Configure Trigger:
- Do not tick checkbox “Wait for Tags”. We do not recommend using the “Wait for Tags” option by default with forms, since it can break form submission. It is safe to use if you thoroughly test it.
- Tick checkbox “Check Validation”. This checks that the form is actually submitted.
- Enable When:
- Select options: Page Path contains “contact”. This enables the trigger on pages that have “contact” in the path, for example, https://www.advance-metrics.com/contact. You should change this to enable the trigger on the page or pages of your website that contain the contact form. You can also enable the trigger on all pages, if required.
- Fire On:
- Select options: Form ID contains “contact-form”. This uses the variable you enabled in Step 2 and the unique id you identified in Step 1 to specify exactly which form you want to track as a “Contact Form Submission”. Change “Form ID” to whichever variable you enabled in Step 2, and change “contact-form” to the identifier you found in Step 1.
- Click “Create Trigger” to save.
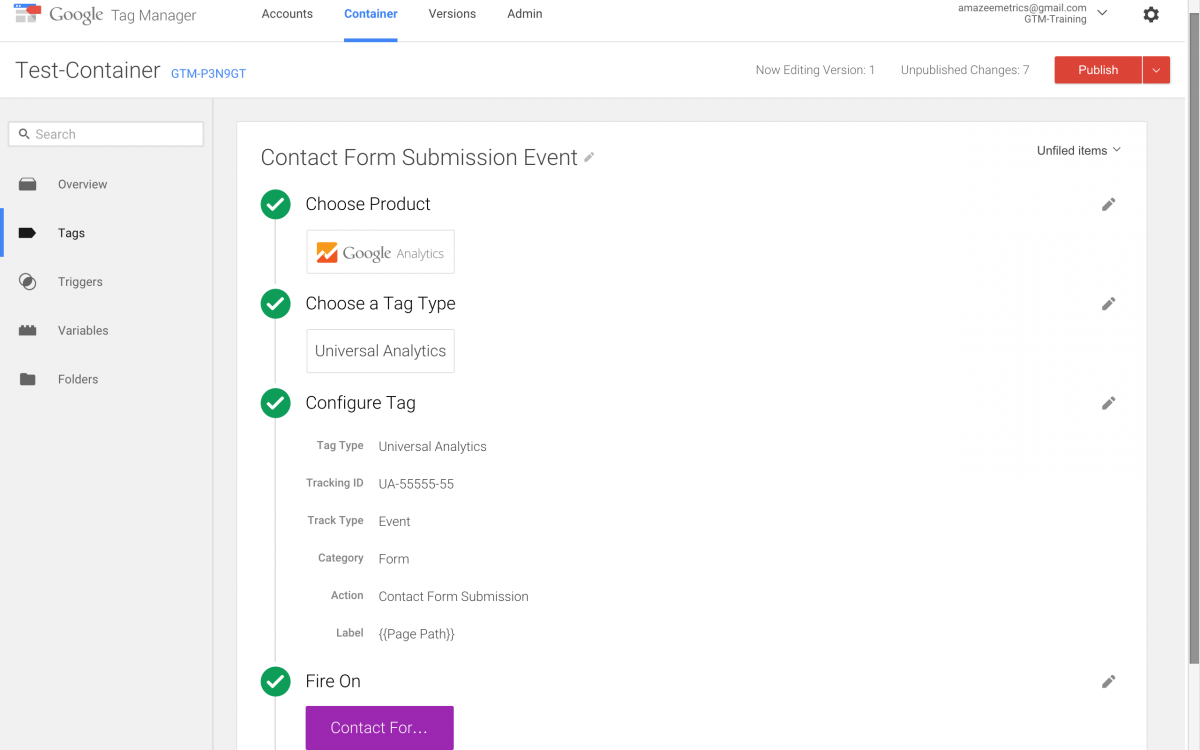
4. Create Form Submission Event Tag
The last step in tracking form submissions is simply creating a tag that will record the event in Google Analytics with the labels that you want. The event occurs when the conditions of the Contact Form Submission trigger that you set up in the previous step are met. Now all you need to do is put all the pieces together in this tag:
- Under “Tags”, click “New”.
- Replace “Untitled Tag” with a descriptive name like “Contact Form Submission Event”.
- Choose Product: Select “Google Analytics”.
- Choose a Tag Type: Select “Universal Analytics” or “Classic Google Analytics”, depending on which tracking codes you currently use on your website.
- Configure Tag:
- Tracking ID: Enter the Tracking ID of the Google Analytics property for your website.
- Track Type: Select “Event”.
- Category: Enter “Form”.
- Action: Enter “Contact Form Submission”. You can rename the event category and action to match whatever event naming convention you use.
- Label: Enter “{{Page Path}}”. This is optional. We find it helpful to be able to quickly see what page a form was submitted on.
- Non-Interaction Hit: Select False. This means that this event will change your bounce rate, because it will be counted as an interaction on your site. You should decide if you prefer to count form submissions as interactions or not, and adjust this accordingly.
- Fire On:
- Select “Form”.
- From the “Choose from existing Form Triggers” menu that pops up, select the “Contact Form Submission” trigger you created in step 3.
- Click “Create Tag” to save the tag.
You’re almost done! As always, you should debug the setup to make sure it is functioning, save a version, and publish it.
The three parts of this tutorial for Google Tag Manager Version 2 have demonstrated how to track outbound links, file downloads, and form submissions. Are there other types of events you would like to track? Are you ready for more complicated tags, or are you already overwhelmed? If you need extra help, please feel free to send me an email.