Part 4: Contact Forms
UPDATE: This blog post was written for Google Tag Manager version 1, which is now obsolete. See the updated version of this Google Tag Manager Tutorial for GTM version 2.
In this fourth and last part of our Google Tag Manager Guide, we demonstrate how to track one of the most important lead-generators on your website, the contact form.
In this example, we want to show how event tracking can be customized for your specific business objectives. With some smart customization, you can report not only how many times a “Contact Us” form is submitted, but also information about what users enter in the form (never personally identifiable information!). In this example, we will use a form that has a “Contact Type” menu, where users select an option like “General Inquiry” or “Request a Quote”. This example shows how to capture which option users select and record it as part of the event tracking.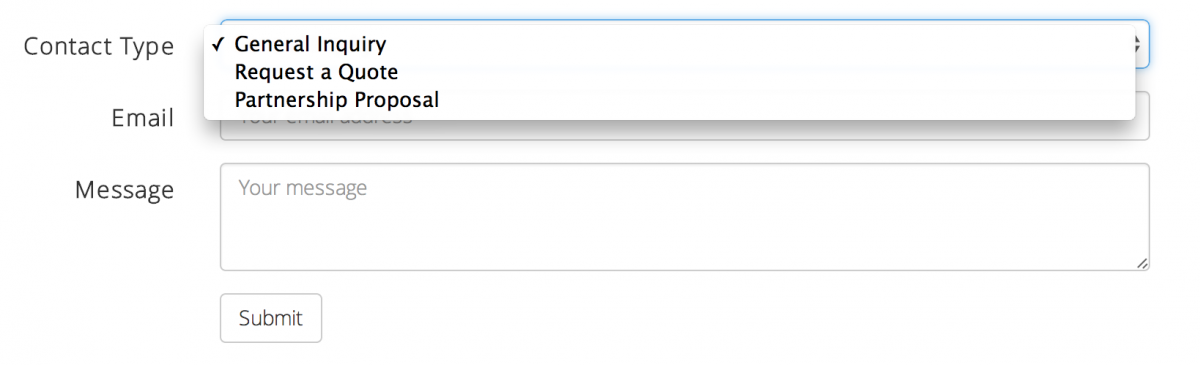
This tutorial assumes you’ve followed along from Part 1, since each part builds on the last. So if you haven’t completed the steps described in parts 1, 2, and 3, please refer back to them to learn the basic examples of creating event listeners, rules, macros and event tracking tags. This last example is the most complex so far.
1. Create a Form Submit Listener
If you already followed the steps in Part 3 to create the Form Submit Listener, it is not necessary to make a second one. If you have not created a Form Submit Listener so far, do it now.
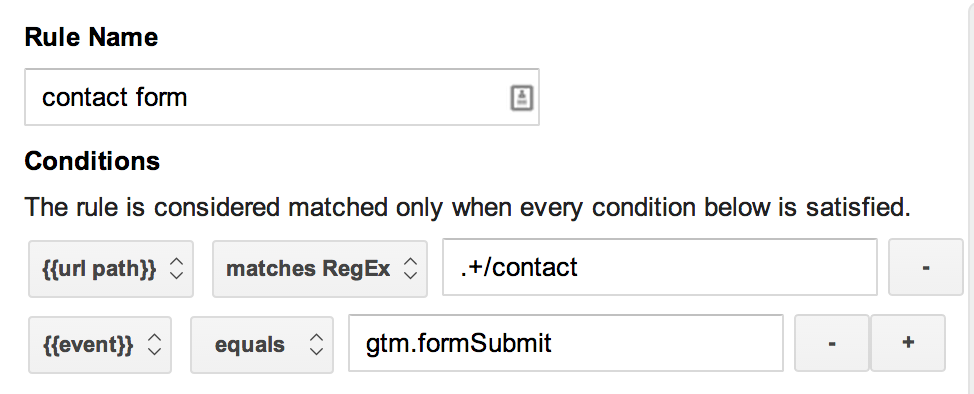
2. Contact Form Rule
You should remember from previous tutorials that rules in Google Tag Manager identify what it is you want to act on (like a page or an event). To create a rule that identifies a contact form, you need to look at the specific contact form and find a way to uniquely identify it. This could be as simple as specifying the url of the page the form is in, or it may involve looking into the HTML code to find an attribute of the form like a class or id. See the details in step 2 of Part 3 on how to inspect your form to find a unique identifier.
In this example, we have the following contact form on a page with url that ends with “/contact”. We can easily create a rule for a form submission on this page using a regular expression that will match only that url:
- Click New and select Rule from the dropdown menu.
- Fill in Rule Name with “contact form”
- Set these Conditions:
- {{event}} equals gtm.formSubmit
- {{url}} matches Regex .+/contact
- Click Save.
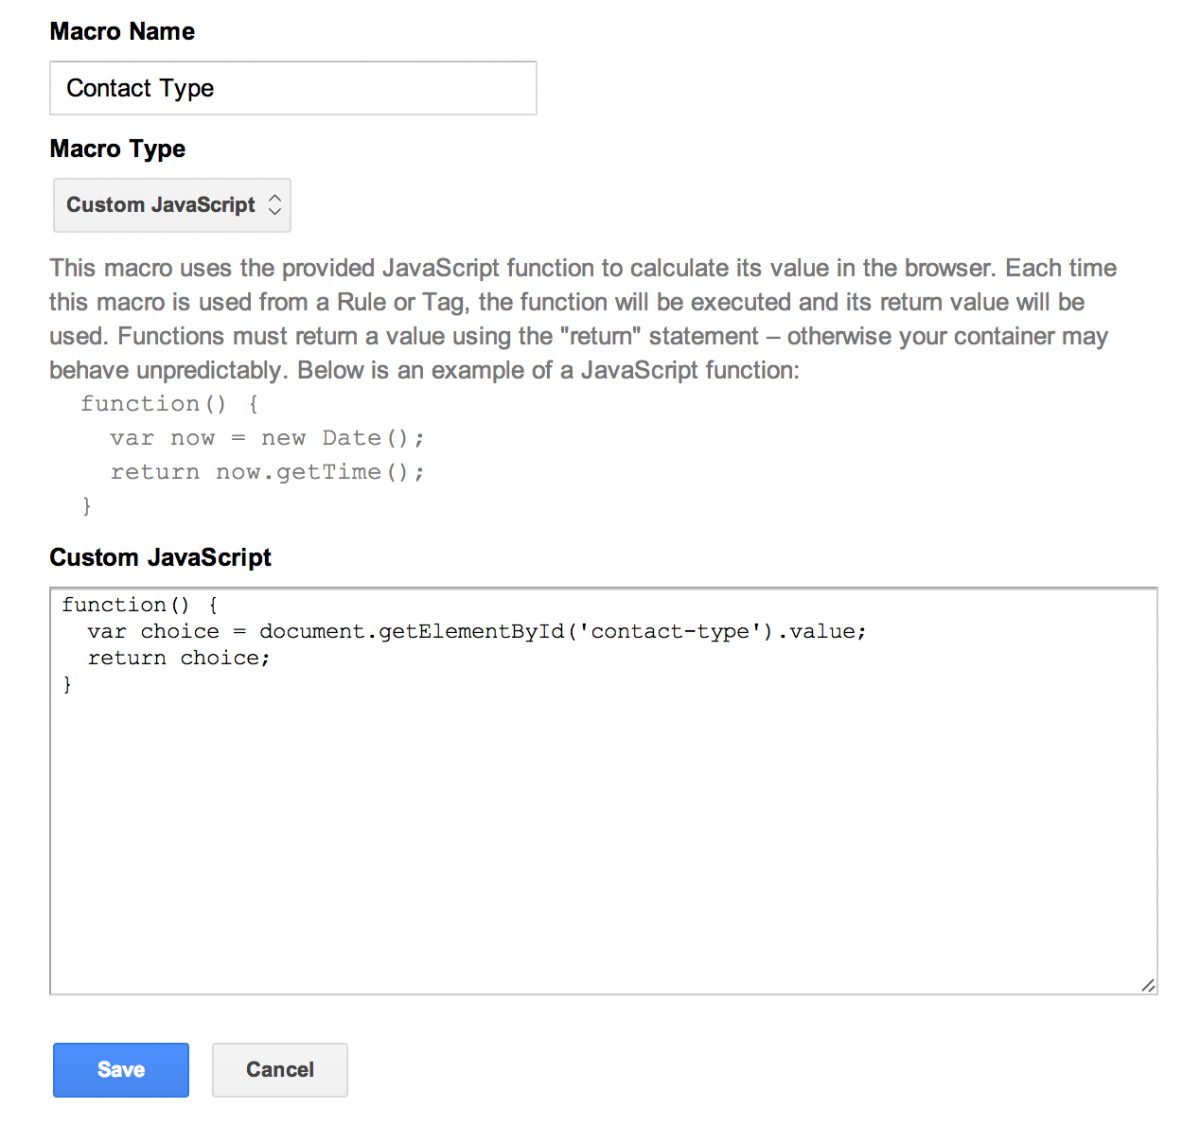
3. Contact Type Macro
Next you need to create a macro that can return the user’s selection from the form’s “Contact Type” menu. This requires a few lines of custom Javascript that find the id attribute of the menu, “contact-type”. The code for the form looks like this: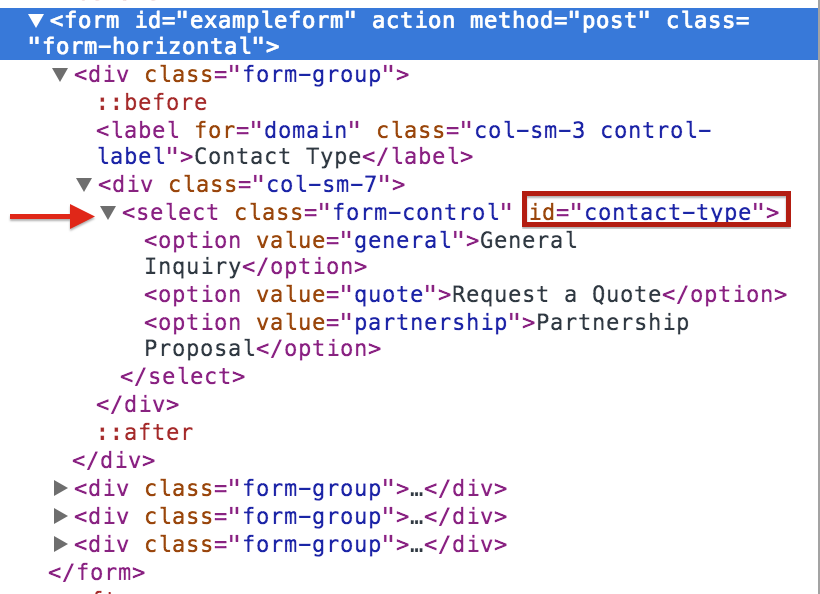
You can see that the dropdown menu (in HTML this is the <select> tag) has the id “contact-type” and each option has a “value” attribute. We can use these in the following Javascript snippet to get the value of the selected contact-type when a user submits a form:
document.getElementById('contact-type').value;To customize this example for your website, substitute the id of your dropdown menu in the snippet:
document.getElementById('YOUR ID HERE').value;If the dropdown (or other element in your form that you are trying to track) has no id, you’ll have to use a different method to grab the element by class or name.
So to create the macro:
- Click “New” and select “Macro” from the dropdown menu.
- Fill in Macro Name with “Contact Type”.
- Select Type: Custom Javascript.
- Copy and paste the following into the input box for Custom Javascript:
function() {
var choice = document.getElementById('contact-type').value;
return choice;
}- Click Save.
4. Contact Form Submit Tag
Finally, you need an event tracking tag to send the event to Google Analytics:
- Click New and select Tag from the dropdown menu.
- Fill in Tag Name with “Contact Form Submit”.
- Select Tag Type: Google Analytics > Universal Analytics OR Classic Google Analytics, depending on which you use in the Google Analytics property for this site.
- Set the Tracking ID for the Google Analytics property for this site.
- Select Firing Rules: Contact Form.
- Select Track Type: Event.
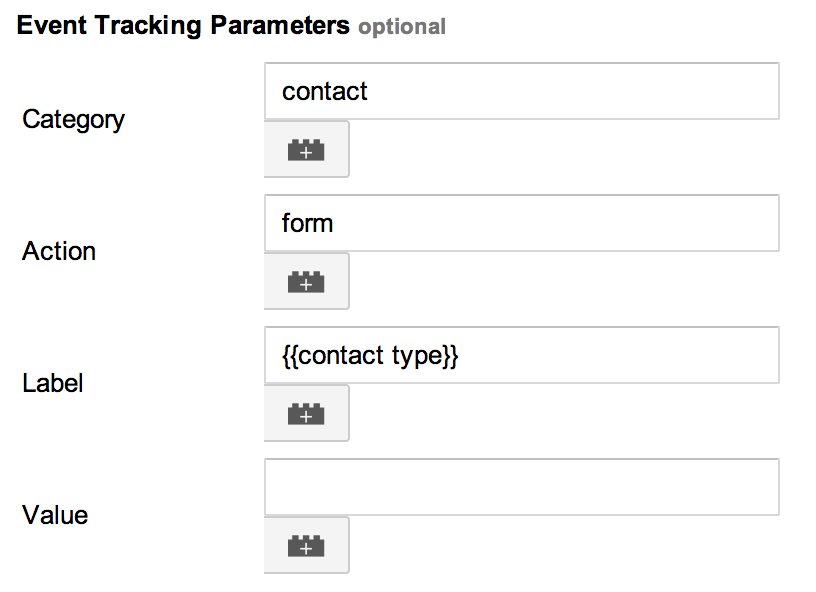
- Set the Event Tracking Parameters. You can decide here what makes the most sense for you: consider how you want events to appear in Google Analytics.
- Category: contact
- Action: form
- Label: {{contact type}}
- Click Save.
When you’re done with all the steps above, debug the setup to make sure it works the way you want, save a version, and publish it.
You can see that while Google Tag Manager offers many built-in features to make tracking easier, it still requires quite a lot of understanding of how your website works. At the very least, you need to be comfortable working with your browser’s developer tools to inspect code. To really get the most out of it, you need to be able to use your browser’s console and to poke around in Google Tag Manager’s dataLayer.
Now that you have set up some basic event tracking, see what you can do to customize your events!