Part 3: Newsletter Subscriptions
UPDATE: This blog post was written for Google Tag Manager version 1, which is now obsolete. See the updated version of this Google Tag Manager Tutorial for GTM version 2.
In the third part of our Google Tag Manager Guide, we introduce a new type of event: form submission. Tracking forms with Google Tag Manager is a particularly useful technique when your website does not show confirmation pages after users fill out a form. Thanks to the built-in event tracking tags in Google Tag Manager, this is possible without writing and installing custom Javascript.
This tutorial will show you one type of form that you should track: newsletter subscription forms. What you will find here is an example configuration. Since every site is a little different, you will have to adapt this example to your own website. The three steps below describe the general process and indicate which parts need to be changed for your specific website.
1. Form Submit Listener
As you saw in Part 1 when creating the Link Click Listener, Google Tag Manager comes with built in Event Listeners that “listen” for user interactions on your website and capture information about those interactions. To record form submission events, first you need to create a Form Submit Listener that will listen for interactions with form submit buttons:
- Click New and select Tag from the dropdown menu.
- Fill in Tag Name with Form Submit Listener.
- Select Tag Type: Event Listener > Form Submit Listener.
- Select Firing Rules: All Pages. This Rule is pre-configured in Google Tag Manager.
- Select Options:
- Check Validation: Recommended. This option checks whether the form actually submits or if form validation interrupts the submission. An example of this kind of interruption is when a error message tells you that you haven’t filled out a required field. Using this option makes sure that your events are only valid form submissions, not every time a user attempts to submit.
- Click Save.
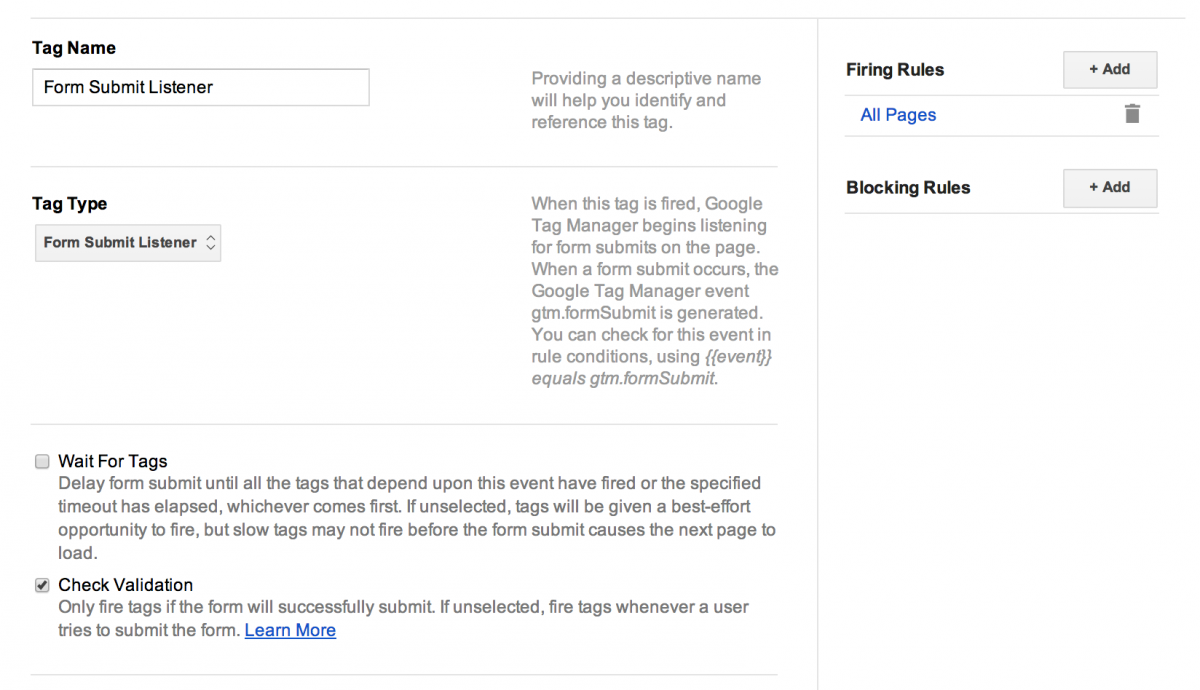
This listener works on all pages of the website, but you can also set the firing rules to only include certain pages.
2. Newsletter Subscribe Rule
To set up a rule that will define when a newsletter subscription has taken place, you’ll have to understand a little more about how the newsletter subscription form works on your website. Here is an example from our website (advance-metrics.com) to illustrate how you can do that:
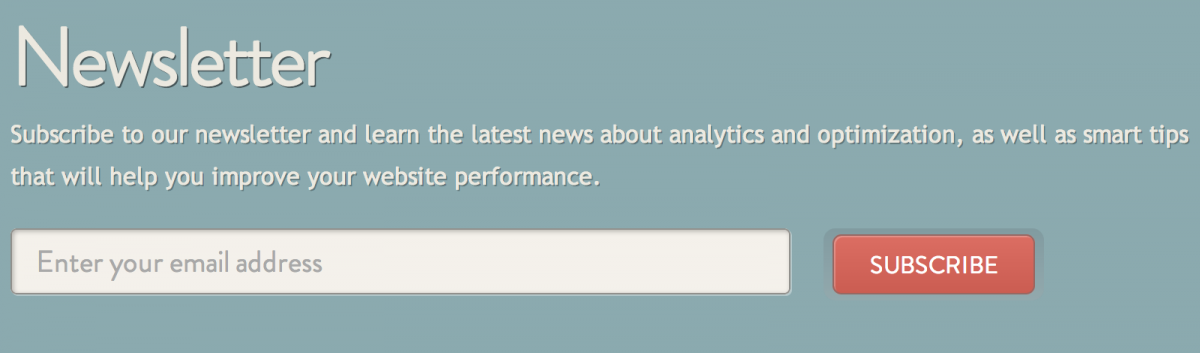
If you inspect it with your browser’s developer tools, you can look at the html elements that make up the form.
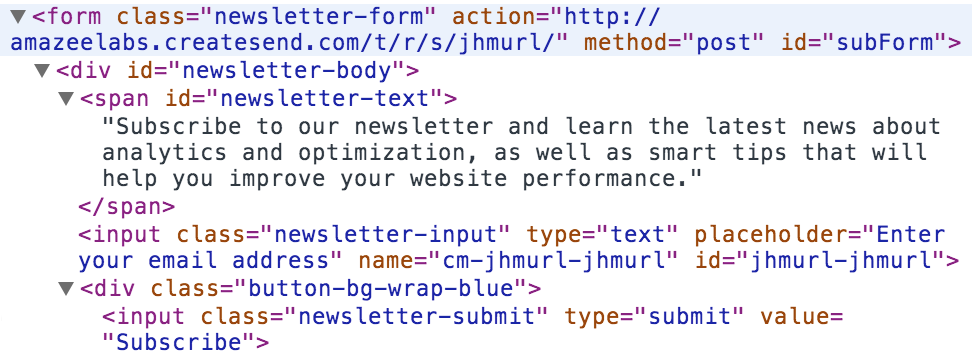
You need to find some attributes that are unique to the form. Here you can see that the form has a class, “newsletter-form”. This is a good identifier that is not used on any other elements in the website. Now that you have a unique attribute to identify the form, you can set up the rule:
- Click New and select Rule from the dropdown menu.
- Fill in Rule Name with “Newsletter Subscribe”
- Set these Conditions:
- {{event}} equals gtm.formSubmit
- {{element classes}} equals “newsletter-form”
- Click Save.
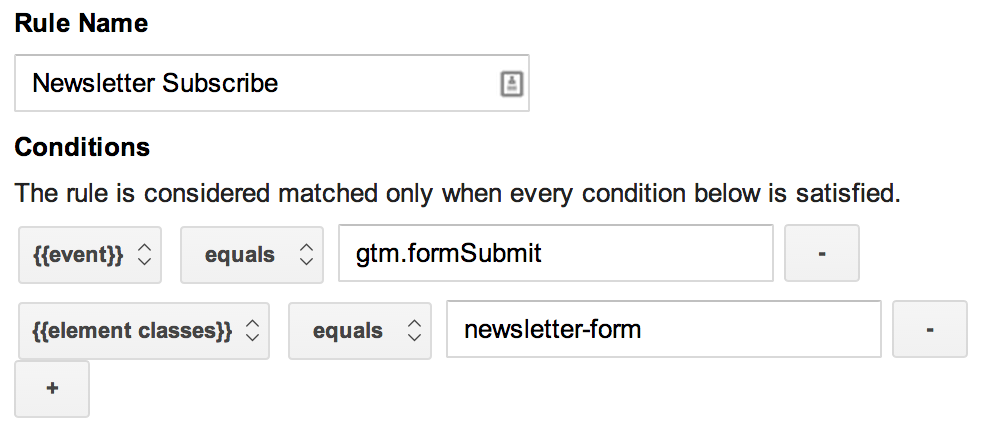
These conditions mean that the event listener you created in step 1 says a form has been submitted (event = gtm.formSubmit) and the form was the one with a class attribute “newsletter-form”. Instead of “newsletter-form”, you should define the {{element classes}} condition using the class you found in your site. You could also use {{element id}} if your form has an id attribute and not a class, or another macro that helps you uniquely identify the submission.
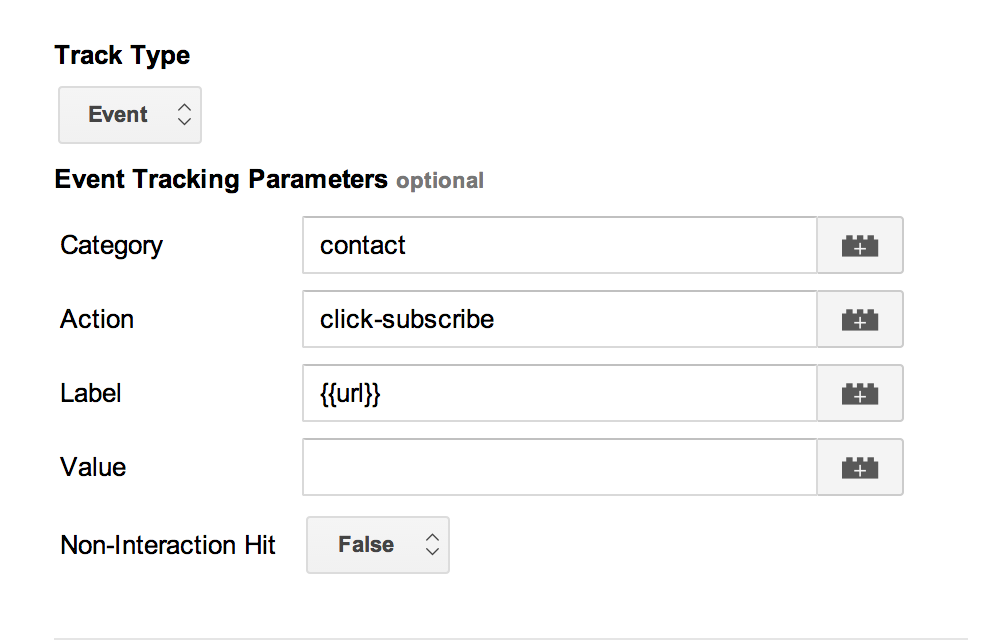
3. Newsletter Subscribe Submit Tag
The last step in tracking newsletter subscriptions is simply creating a tag that will record the event in Google Analytics with the labels that you want. The event occurs when the conditions of the Newsletter Subscribe rule that you set up in the last step are met. Now all you need to do is put all the pieces together in this tag:
- Click New and select Tag from the dropdown menu.
- Fill in Tag Name with “Newsletter Subscribe Submit”.
- Select Tag Type: Google Analytics > Universal Analytics OR Classic Google Analytics, depending on which you use in the Google Analytics property for this site.
- Set the Tracking ID for the Google Analytics property for this site.
- Select Firing Rules: Newsletter Subscribe.
- Select Track Type: Event.
- Set the Event Tracking Parameters. You can decide here what makes the most sense for you: consider how you want events to appear in Google Analytics.
- Category: contact
- Action: click-subscribe
- Label: {{url}}
- Click Save.
You’re almost done! As always, you should debug the setup to make sure it is functioning, save a version, and publish it.
In the final part of this guide, we will show you a more complex example of form tracking, using the example of a contact form.