UPDATE: This blog post was written for Google Tag Manager version 1, which is now obsolete. See the updated version of this Google Tag Manager Tutorial for GTM version 2.
Part 1: Outbound Links
Even though Google Tag Manager is a relatively easy way to manage snippets of tracking code for a website, it can still be a bit confusing to new users. That’s why we decided to help simplify it for you with this Google Tag Manager guide. We will walk you step-by-step through the process of setting up basic event tracking that allows you to track four of the most common and most important interactions users make on a website.
Part 1 of this guide will show you how to set up Google Tag Manager to track Outbound Links. In the following weeks: Part 2 will show you how to track the Downloads from your website, Part 3 will introduce tracking simple form submissions and show you how to track Newsletter Subscriptions, and finally Part 4 will show a more complicated type of forms with the example of Contact Form Submissions. Each part of this guide will give you all the Google Tag Manager components, the Macros, Rules and Tags that you need to start tracking.
This tutorial assumes you already have a Google Tag Manager account, have created a Container, and have installed it in your website (if not, start here). You should also already have a Google Analytics account for your website, and have already installed the tracking code with one of the methods recommended by Google Analytics. Start by opening up Google Tag Manager and clicking on your Container to begin adding Tags.
Tracking Outbound Links
It is very useful to know how often users click on links that take them away from your site, and which of these links they click. Unfortunately Google Analytics doesn’t automatically track outbound links. This is a case where Google Tag Manager is the easiest way to add event tracking.
This setup also shows how the Rules and Tags in Google Tag Manager work together. First you will create a Tag that listens to users’ clicks on links on your site. Then, you need to create the Rule that defines what an outbound click is. Then finally, you will create a Tag that records these clicks as Events in Google Analytics.
1. Create a Link Click Listener Tag
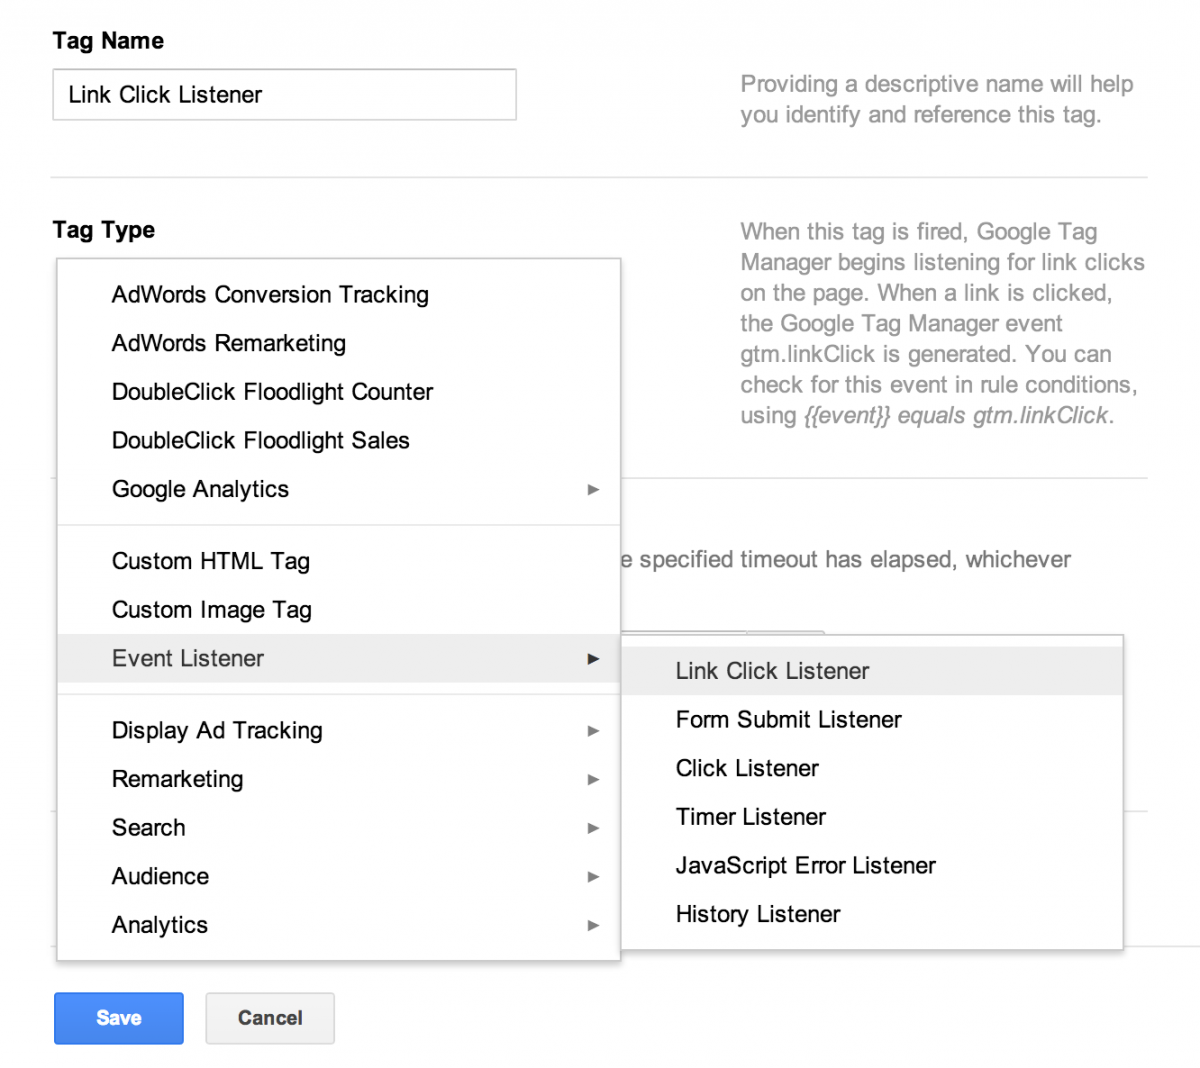
Google Tag Manager comes with built in Event Listeners that wait for users to interact on your website, and capture information about those interactions. Here, you will create a Link Click Listener that listens on all pages of your website for users’ clicks on links.
- Click New and select Tag from the dropdown menu.
- Fill in Tag Name with Link Click Listener.
- Select Tag Type: Event Listener > Link Click Listener.
-
Select Firing Rules: All Pages. This Rule is pre-configured in Google Tag Manager.ave.

2. Create an Outbound Link Rule
Rules in Google Tag Manager tell your Tags when and if they should work. This Rule, for example, says which clicks are outbound link clicks.
- Click New and select Rule from the dropdown menu.
- Fill in Rule Name with Outbound Link.
-
Set these three Conditions:
- {{element url}} does not match Regex (insert Regex for your website here, for example, ^http:\/\/www\.example\.com.*)
- {{element url}} does not contain javascript:void
- {{event}} equals gtm.linkClick
-
Click Save.

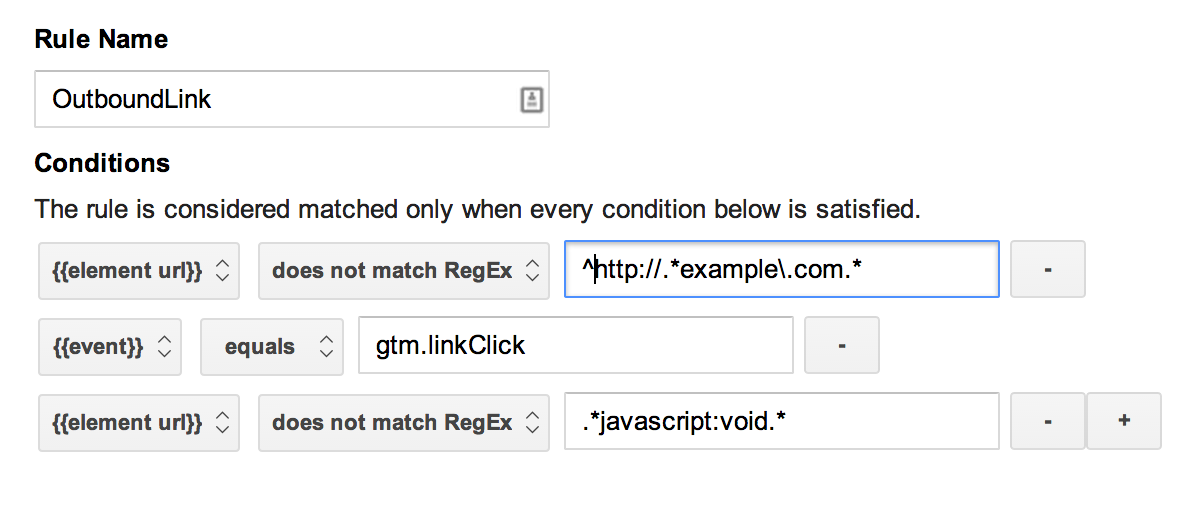
This Rule says: if the link url is not on this website, and the link url is not a bit of Javascript (like some dynamic buttons or menus can be) and a user clicks on it, then do something. What that something is depends on which Tag uses the Rule. Next, you’ll use this Rule in the Outbound Links tracking Tag.
3. Create an Outbound Links tracking Tag
Finally, you’re ready to create the Tag that will track outbound links as events in Google Analytics.
- Click New and select Tag from the dropdown menu.
- Fill in Tag Name with Outbound Links.
- Select Tag Type:Google Analytics > Universal Analytics OR Classic Google Analytics, depending on which you use in the Google Analytics property for this site.
-
Set the Tracking ID for the Google Analytics property for this site.

- Select Firing Rules: Outbound Link.
- Select Track Type: Event.
-
Set the Event Tracking Parameters. You can decide here what makes the most sense for you: consider how you want events to appear in Google Analytics.

- Category: Outbound links
- Action: Click
- Label: {{element url}}
- Click Save.

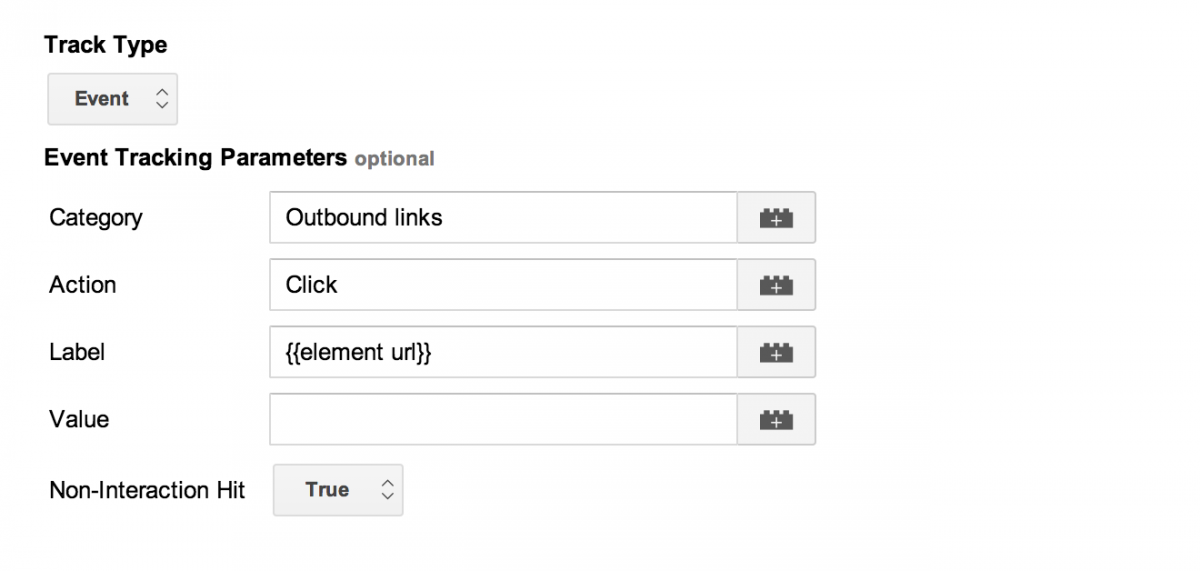
This Tag will record an event with the Category Outbound Links, the Action Click, and with a Label that is the url of the link. That way you can easily see the total number of clicks on outbound links and the clicks on each different link in the Events Report in Google Analytics.
4. Save a Version, Test, and Publish
Before you make any more changes to your container, you should save a Version of the container so that you can come back to this point if you need to. Click Create Version. You can give the version a name that describes what you changed in these steps, for example, “Outbound Links Tracking” by clicking on the pencil icon next to the current Version Name (the default is a number).
The Tags you just created will not start working until you publish them, but first you should test that they are working as expected. You can test the setup with the Google Tag Manager Preview > Debug function. See the Tag Manager Support articles on how to use Preview and Debugging.
If all goes well Publish your version so that the Tags can start working on your site.
If you’ve followed all the steps above, you now have the necessary Rules and Tags in your Google Tag Manager container to start tracking outbound links. Stay tuned in the following weeks for the next parts of this guide (Part 2, Part 3, Part 4)!
UPDATE: This blog post was written for Google Tag Manager version 1, which is now obsolete. See the updated version of this Google Tag Manager Tutorial for GTM version 2.